loadspeaker

Listing all entries tagged JavaScript

How to Disable and Hide the Facebook Chat

After hard and long resistance, I finally gave up and recently signed up for Facebook. I am still not excited about it and quite deeply believe it can mainly bring negatives to people who post all kind of personal stuff. But anyway, since I am using it already from time to time, the single most annoying thing that caught my attention immediately (in the otherwise clean and arguably intuitive interface) was the fixed positioned chat box at the bottom of all pages. There was simply no way to remove it even if I didn't want to use the chat at all. And guess what, it seems the past few days that small collapsed box at the bottom has been transformed into a complete sidebar pushing the rest of the page to the left which is even more annoying (this seems to happen if the browser window is wide enough). Me doesn't like this at all so I am now sharing my solution to this annoyance with you...

Just install this small user script in your browser (Opera, Chrome, Firefox via Greasemonkey or Safari via GreaseKit):

https://raw.github.com/vadikom/facebook-nochat/master/facebook-nochat.user.js

and remove that chat floating box/sidebar for good! As a bonus, it will make sure you always appear unavailable for chat. Second bonus - when the sidebar is removed, the rest of the page will be perfectly centered in your browser window again. Yay!

offsetWidth/offsetHeight useless in IE9, FF4*

OK, I must admit "useless" is a too harsh word but the thing is our beloved offsetWidth/offsetHeight JavaScript DOM properties are now not accurate any more in Internet Explorer 9 and Firefox 4. Firstly introduced in IE4 in 1997, these DOM properties are the simplest and quickest way of getting the computed pixel dimensions (the border-box) of any page element and they used to work perfectly in all browsers released since then. Well, not any more in IE9 and FF4. Read on to learn why and what you can do to workaround the issue...

* A special note for Firefox on Windows/Linux
Firefox 4 on Windows and Linux has this issue only when hardware accelerated rendering is enabled in the Options/Preferences (and, of course, supported on the machine). I always get the issue on Mac.

IE9 and FF4 introduced subpixel font rendering and now calculate and report width/height of page elements using float values even when a web page is viewed at 100% zoom level. This is something no other browser has ever done before. So, right now in IE9 and FF4 you can get computed width/height values for block elements reported like "100.34px", "11.65px", etc. I once heard from a colleague that a client asked him to move a page element by half a pixel because apparently one pixel seemed to much to him. 😃 Well, I've got good news for that guy, this is now possible!

But seriously, let's get back to the issue. As you already may be guessing, the problem with offsetWidth/offsetHeight in IE9 & FF4 is that these properties are integer values so in these browsers the values are computed by rounding the float values for width/height and adding the padding & border. And the rounding often leads to 1px inaccuracy depending on the calculations done in your scripts and on the exact fonts and font sizes used on the page. You may say 1px is nothing but there are cases when 1px could cause quite notable issues like, for example, text wrapping happening when it shouldn't, etc..

Demoing the Problem

Basically now you can easily stumble upon issues in IE9 and FF4 like on this demo page. In this example, offsetHeight is used to get the computed border-box height of the first DIV and the second DIV has negative top margin applied which is equal to the value returned. The end result should be perfectly overlapping DIVs, so that you could only see the second one. But in IE9 or FF4, you can see either the top or the bottom border of the first DIV sneaking beneath the second DIV for some of the iterations:

A screenshot showing the top border of the first DIV sneaking beneath the second DIV

The Workaround

From the demo above we clearly see we can no longer use offsetWidth/offsetHeight if we want perfect results in these browsers. The workaround is to use the getComputedStyle() method instead which reports the width/height of block elements with float numbers. So basically, the workaround is to get the computed width/height and then add the computed top/bottom padding & border of the element to get the final value. The problem with getComputedStyle() on theory is that for width/height of inline elements it always reports 'auto'. But the good news is these browsers only seem to round the computed float values for block elements and so for inline elements we can still safely use offsetWidth/offsetHeight! Well, if you are still following me, here is a fully cross-browser workaround compatible with all other and older browsers:

function _getOffset(elm, height) {
	var cStyle = elm.ownerDocument && elm.ownerDocument.defaultView && elm.ownerDocument.defaultView.getComputedStyle
		&& elm.ownerDocument.defaultView.getComputedStyle(elm, null),
		ret = cStyle && cStyle.getPropertyValue(height ? 'height' : 'width') || '';
	if (ret && ret.indexOf('.') > -1) {
		ret = parseFloat(ret)
			+ parseInt(cStyle.getPropertyValue(height ? 'padding-top' : 'padding-left'))
			+ parseInt(cStyle.getPropertyValue(height ? 'padding-bottom' : 'padding-right'))
			+ parseInt(cStyle.getPropertyValue(height ? 'border-top-width' : 'border-left-width'))
			+ parseInt(cStyle.getPropertyValue(height ? 'border-bottom-width' : 'border-right-width'));
	} else {
		ret = height ? elm.offsetHeight : elm.offsetWidth;
	}
	return ret;
}
function getOffsetWidth(elm) {
	return _getOffset(elm);
}
function getOffsetHeight(elm) {
	return _getOffset(elm, true);
}

Usage is very simple:

var elmOffsetWidth = getOffsetWidth(elm);
var elmOffsetHeight = getOffsetHeight(elm);

And here is the fixed demo page that includes the workaround.

The Questions

Finally, here are the questions that come to my mind:

  1. Is this the road all other major browsers (i.e. WebKit and Opera) plan to take in the future?
  2. If not, why did IE and FF did it then and shouldn't they revert to the old behavior?
  3. If yes, then shouldn't at least offsetWidth/offsetHeight be fixed to return the preciser float values?

I guess you'd agree it's nice to have these questions answered.

Fix for #NewTwitter: Scrolling the Details Pane

I am getting more and more used to #NewTwitter and generally like the new features. Particularly the details pane, which provides quick preview of images, videos, etc. is really very useful. However, there is something related to it that annoys me much - if you scroll it with the mouse wheel (which is definitely the case with the majority of users) once you reach the top or bottom and continue scrolling (e.g. by accident, which happens to me very often), the whole page begins scrolling and you can easily lose sight of the tweet on the left to which the pane is related. So I am now sharing a simple fix and if you like it, please help to let the guys at Twitter know about it.

Update: Twitter have changed their design so this post covers a previous issue on their website and is no longer relevant.

First, a very quick demo of what I mean:

And the JavaScript/jQuery snippet which fixes the issue:

$('#page-container div.pane-components').live('mousewheel DOMMouseScroll', function(e) {
	var scrollTop = this.scrollTop,
		clientHeight = this.clientHeight,
		scrollHeight = this.scrollHeight,
		originalEvent = e.originalEvent,
		scrollingUp = (originalEvent.wheelDelta || -originalEvent.detail) > 0;
	if (scrollingUp && scrollTop == 0 || !scrollingUp && scrollTop + clientHeight == scrollHeight)
		e.preventDefault();
})

It just checks if the top or bottom of the details pane has been reached and when it has, the default action the mouse wheel event triggers (i.e. scrolling the whole page) is prevented.

If you would like to test the fix on your own, just load some Twitter page in your browser, then copy/paste the following code in your browser address bar and hit the "Enter" key:

javascript:$('#page-container div.pane-components').live('mousewheel DOMMouseScroll', function(e) {
	var scrollTop = this.scrollTop,
		clientHeight = this.clientHeight,
		scrollHeight = this.scrollHeight,
		originalEvent = e.originalEvent,
		scrollingUp = (originalEvent.wheelDelta || -originalEvent.detail) > 0;
	if (scrollingUp && scrollTop == 0 || !scrollingUp && scrollTop + clientHeight == scrollHeight)
		e.preventDefault();
});void(0)

And for a permanent fix, until eventually Twitter fixes the issue, you can install the following user script in your browser (Opera, Chrome, Firefox via Greasemonkey or Safari via GreaseKit):

https://github.com/vadikom/twitter-scroll-fix/raw/master/twitter-scroll-fix.user.js

Spread the Word

If you find this fix useful, tweet about it so that it can reach the guys at Twitter and they consider using it or a similar solution.

Well, that's all I can do about it.

Zoom Image - (Greasemonkey) User Script

Zoom Image is small user script I originally wrote back in 2005 for Greasemonkey and Opera but nowadays Chrome (out of the box) and Safari (through GreaseKit) users could use it too. The basic idea is pretty simple - the script displays a small toolbar with some buttons in the top left corner of any image when you hover it allowing easily to zoom in/out just the image without the need to zoom the whole page.

It may seem a pretty insignificant addition to your browser's features at first sight but, at least for me, it has proven to be a really handy one and I have not stopped using it in my main browser (Opera) since I first wrote it. BTW, the original version of the script was featured in Mark Pilgrim's Greasemonkey Hacks book which means at least one other user found it useful. 😀

Anyway, I am now publishing v2.0 which brings some nice improvements over the previous release.

What's new in v2.0

  • you can now even easier zoom in/out the image by using the mouse wheel too - just hover the toolbar (any button) and use the mouse wheel (if you have one, that is :P)
  • rewritten OO code allowing easily to add more custom buttons
  • improved look (arguably) of the menu/buttons including light and dark style
  • added optional show fade-in animation - disabled by default as it might become obtrusive over time (at least for me it does)

User Configuration

The script includes the following options which you could tweak to your liking:

zoomFactorClick = 1.5,		// zoom in/out by this factor each time
zoomFactorMouseWheel = 1.2,	// just hover the toolbar (any button) and use the wheel
showTimeout = 1.2,		// seconds
minimalImageWidth = 60,		// minimal width of the images the toolbar is activated for
minimalImageHeight = 50,	// minimal height of the images the toolbar is activated for
opacity = 0.80,			// opacity for the toolbar
fade = false,			// use fade animation when showing the toolbar
darkStyle = false,		// use dark style for the toolbar
zIndexFix = true;		// try to keep the zoomed image on top of other elements on the page

Adding More Custom Buttons

As mentioned, the script is now rewritten and allows more easily adding custom buttons to the toolbar. You can create a custom button like this:

var myButton = new Button(name, className, title, contentHTML, handlers);

And then append it to the toolbar like this:

zoomToolbar.addButton(myButton);

Example: Adding an "open" button

Here is a quick example how to add an "open" button which when clicked, loads the image in a new blank browser window:

var openButton = new Button('openButton', 'text-button', 'Open Image in New Window', 'open', {
	click: function() {
		window.open(image.src);
		zoomToolbar.hide();
	}
});
zoomToolbar.addButton(openButton);

I have added this button at the end of the Zoom Image code as well as another button "size" which when clicked reports the original dimensions of the image in a JavaScript alert popup. These buttons are disabled by default (the code is commented out) but you could enable them if you like.

Download / Install

Here is a direct link to the latest version available in the code repository:

http://github.com/vadikom/zoom-image/raw/master/zoom-image.user.js

The code is hosted on GitHub:

git clone git://github.com/vadikom/zoom-image.git

Poshy Tip - jQuery Plugin for Stylish Tooltips

I almost hear you asking - why another jQuery tooltip plugin? Well, I actually never planned creating this plugin until I reached the final stages of designing this website and decided to add some pretty tooltips. So I started looking for a tooltip plugin that allows easily creating stylish tooltips and also includes the most useful features for such a script. However, I wasn't pleased with the results I found so I ended up writing a completely new plugin and am now making it available for all.

Demos

You might be eager to take a look at some examples so here is the demo page right away. And below you will find a short introduction.

Notable Features

OK, so apart from the awful name, is there anything interesting about this tooltip plugin?

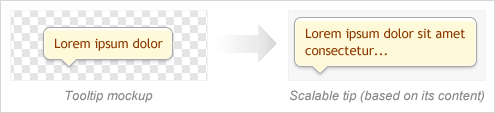
A Single Background Image for Scalable Tooltips

Suppose you need to code a scalable tooltip that looks like this (i.e. a tooltip with auto width/height based on the content inside it):
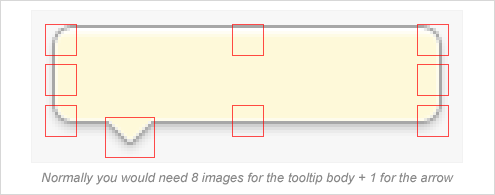
A figure showing a tooltip mockup that should be used to create a scalable tooltip on the page

The Usual Approach

To achieve this with most similar plugins out there you would need to slice the image into multiple separate images - for the corners of the box, for the sides, etc.:

A figure showing how you would normally need to slice the mockup into 9 images in order to code a scalable tooltip

The Poshy Tip Approach

But since the tooltips only work when JavaScript is enabled anyway, why not apply some JS magic which would make our life easier and save our server some additional requests? This is exactly what Poshy Tip was designed to do. With this plugin, you can create a scalable tooltip by just using a single background image for the tooltip body:

With Poshy Tip you need just 2 images - one for the tooltip body + 1 for the arrow

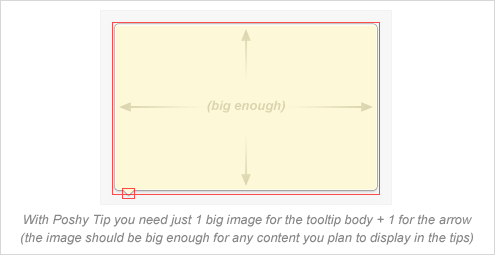
You need to create one big image for the tooltip body - e.g. something like 1024x768 pixels (which should be enough for anything you may want to display inside a tooltip in the browser viewport). You then have to set it as a background image for the tooltip container DIV in the most trivial way:

.tip-yellow {
	...
	background-image: url(tip-yellow.png);
}

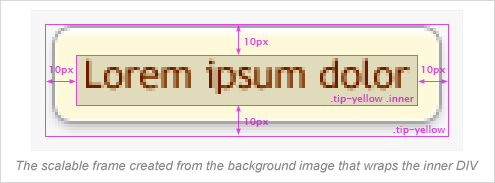
Poshy Tip detects when a background image has been set for the tooltip container DIV and creates a scalable frame from it that wraps the inner contents of the tip. Finally, you just need to specify what should be the size of the background image frame around the inner content by setting the following option:

bgImageFrameSize: 10 // pixels

And the result:

A figure showing the scalable frame created from the background image that wraps the inner DIV

You can, of course, tweak the margin/padding of the inner DIV if needed.

Advanced Positioning Options

With Poshy Tip you can position the tips relative to the mouse cursor or to the target element and align them in every possible way horizontally and vertically (note the alignTo, alignX and alignY options). In addition the script makes sure the tips are always displayed in the browser viewport and also automatically positions the arrow (if available) on the appropriate side of the tooltip body.

Asynchronous Loading of the Tooltip Content

Poshy Tip supports using a function for returning the tooltip content and the script also passes an update callback function as an argument to this function. By using this callback, you can easily update asynchronously the content of the tooltip after it has been displayed. You can see a quick example on the demo page.

Documentation

You can find usage examples and a list of the options and methods available on the demo page.

License

Like jQuery, Poshy Tip is dual licensed under the MIT and GPL licenses.

Git

The Poshy Tip source code is also available at GitHub:

git clone git://github.com/vadikom/poshytip.git